Thursday, 12 November 2015

The Best Brands of Fake Tan

I have put together a list of the top 5 fake tan brands that I have used. All of them are reasonably priced and affordable so they wont break the bank!


    https://squeezielou.files.wordpress.com/2013/04/cocoa-brown-tan-2.jpg
  • Cocoa Brown: this is one most popular tanning brands because of its good quality and low price. It is priced at euro6.90 and can be found in Penney's stores around Ireland. This tan shows up straight away and dries into the skin fast. If you are using this tan make sure to moisturise your skin daily as it tends to dry out your skin.


https://thebeautyblunder.files.wordpress.com/2015/02/st-tropez-self-tanning-products.jpg
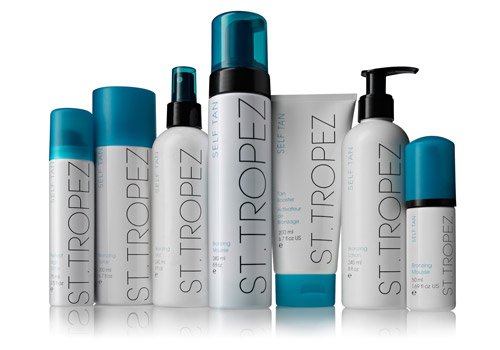
  • St Tropez: this tanning brand has gradual tanners and tanning mousse that are very moisturising for your skin as they have a skin nourishing formula. It is priced at around euro18 and up depending on the type of tan you want. It can be found in all pharmacies.
https://blogger.googleusercontent.com/img/b/R29vZ2xl/AVvXsEjSbCi8kvVL3zD-rp_-NNLjrTfFeuhHzeJewYCorAqhnzxCvfNk8HfOMdCIZb7ael5M1DgBtlyih-tXqPMYp0uvDqa6651Y4jgteqYL74kr5PAxNhuufTgrtkZRACrD8rFckcoKGKBPgAfn/s1600/sally_hansen_airbrush_legs.jpg
  •  Sally Hansen: this tan covers up freckles and imperfections and has a matte finish. It gives off an airbrush effect and is water resistant. It is available in 5 different shades ranging from light to dark. It is priced from euro16 and up and can be found in Penney's and pharmacies.
http://www.spectra-packaging.co.uk/docstore/articleimages/bBold_main.jpg
  •  bBold: this brand is one of my favourites. It may not be as cheap as the other brands but you get what you pay for! It has anti-aging ingredients in it which keeps your skin looking and feeling fresh. It also doesn't give off that strong tan smell because it is infused with pleasant odours. It is priced from euro19 and up. It can be found in all leading pharmacies.
http://www.getthegloss.com/media/image/rimmel.jpg
  •  Rimmel: and finally Rimmel. There are many Rimmel tanning products to choose from. The best thing about the Rimmel brand is that it can be applied the day of the event and it doesn't leave you with a streaky tan. It is water resistant which means no blotchy tans. It is priced from euro8 and up. And can be found in most shops and pharmacies.


How to Fix a Bad Fake tan

Lemons: juice some lemons and add some baking soda. Rub it into the skin and leave it for a few minutes then shower it off. This formula is proven to help fix a streaky fake tan. 

Soak in the bath: by doing this it loosens the top layer of dead skin cells and helps to remove that layer of bad tan. Using body scrubs in the bath can help to remove dead skin cells.

Dry brushing: using a body brush scrub your skin. The best way to remove fake tan is to excoriate it off your skin. Make sure to moisturise your skin afterwards to prevent it drying out.
 
An affordable product I would recommend to buy if you are trying to remove a tan is Coco Browns very own exfoliating formula called 'Tough Stuff'. This can be found in Penney's and Boots. Some exfoliating tools that are also helpful are exfoliating gloves which you can purchase in any of the leading pharmacies. You could also try to make your own sugar body scrub using a blend of honey and sugar.


how to remove fake tan


History of Fake Tan


In the 1920s tanned skin was considered a sign of poverty. Powdery pale skin that rarely saw the sun was a sign of glamour and luxury. Coco Chanel changed this after coming back from a yacht trip in the Cannes in 1923 with a bronze glow complexion.


This began a phase which made people flock to tropical countries to get that sun-kissed look.

Tea bags were used during WWII to create that natural bronzed look. Less than 10 years later the first fake tanning product was being sold. It was called the 'Man Tan'. Instead of staining the skin the Man Tan used a chemical made of sugar cane, dihydroxyacetone (DHA) this caused a bronzing effect with the amino acids on the surface of the skin. The FDA approved of this ingredient in the 1970's and it is still used in many fake tanning products today.

 There was a rise in skin cancer which was noticed by dermatologists as a result of exposure to UV rays from lying in the sun. Because of this self-tanners became a substitute for laying in the sun. In the 1990's there was a huge variety of fake tanning products available, giving people the look of a carrot. This is where the term 'tangoed' first arose. Tanning beds also became a substitute for laying in the sun until it was discovered that tanning beds were just as harmful as laying in the sun.


People were put off using self-tanners for two reasons. The strong smell from the tan which was because of the dihydroxyacetone (DHA) used in the tans and the often 'oompa lumpa' like orange colour which came from using these self-tanners.

 In previous years fake tanning products have got rid of the strong smell and the orange colour and have created products that provide a more natural glow. They did this by using a formula with either 100%  natural form of dihydroxyacetone (DHA) taken from renewable plant sources or they mixed dihydroxyacetone with keto sugar molecules which provided a more natural glow and a longer lasting tan.   


http://www.huffingtonpost.com/robert-applebaum/history-of-fake-tanning-s_b_3818206.html


How to Apply Fake Tan

  1. Shaving: shave your legs at least 24 hours before applying any tan to the skin. This allows time for the pores to close and prevents the skin from reacting to the tan product.
  2. Prepare your skinbefore applying any fake tan you need to exfoliate your skin in the shower using body scrubs or exfoliating gloves. Pat your skin dry with a towel and moisturise at the elbows, knees, hands, wrists and ankles. These are the areas that the tan tends to stick because the skin is more dry and by moisturising it can prevent this.
  3. Applying the tan: get a tanning mitt for applying the tan. This prevents the tan from leaking through onto the palm of your hand. Start to apply your tan on the legs first and work your way up the body. Put a blob of the tan of your choice onto the mitt and rub it in circular motions onto the body. Leave the tan to dry on your skin for at least 15 minutes before putting clothes on over it. Try to wear lose fitted clothing after application to prevent any of the tan coming off.
  4. Tanning your hands: when it comes to applying tan to the hands less is more. To prevent the tan from sticking to your knuckles make sure to moisturise your hands and then use the excess tan left on the mitt and apply it to the hands.
  5. Tanning your face: remove all makeup from your face and apply a light moisturiser. Applying petroleum jelly under the eyes to prevent the tan from darkening the bags under your eyes, also apply some to the eyebrows to prevent the eyebrows turning orange. Put a small bit of the tan product onto the mitt and gently rub it into the face. Rub the excess product up onto the ears to give them a bronzed look.
  6. Prolonging your tan: to make the tan last longer moisturise your body after showering. Avoid shaving your legs after applying the tan as this removes the layer of tan.

http://health.howstuffworks.com/skin-care/cleansing/products/exfoliating-tools.htm